Temperature Sensors for Linux
| DigiTemp.com-->Documentation |
| Software | Products | Ordering | Documentation | Support | Contact |
Temperature Range
The temperature range of the DS1820 is actually -55 C to +125 C. But
if you are using the passive adapter, which is powered from the serial port,
most systems will only be able to read temperatures up to about +70 C. I have two
machines here, one which reads up to about +120 C and the other that
only reads up to +75 C. If you require temperature readings in the
+70 C to +125 C range then you will need to supply +5v to the power pin
of the DS1820.
The DS9097-U adapter has a strong pull-up option which may enable reading higher
temperatures, but it is still limited by the power supplied from the serial port.
The bottom line is that if you need reliable temperature reading above +70C you
should supply power to the 3rd pin of the temperature sensor.
Accuracy
There are some problems with the temperature accuracy in the DS1820
that have been corrected in the new DS18S20. Please read
this Dallas Semiconductor document
for a description of the problems and the fixes that they implemented. As far as
I know all current DS1820's being sold are really DS18S20, they didn't change the
label on the sensors -- but the sensors look different. The DS18S20 is shorter
than the DS1820. The DS1820 looked like a tall transistor, and the DS18S20 looks
like a normal sized transistor.
[Insert Pictures here]
Long Wire runs (glitches)
If you have long wire runs and are having problems with glitches you should
add a Schottky diode to the end of your network. I used a 1N5817 diode
reverse biased across the DS18S20 sensor in the attic. I was getting
multiple glitches per hour before adding it and now I have seen 1 glitch
in several weeks. I have received reports from users that they have
wire runs up to 1000' that are working with diode equipped sensors on
the end. Adding power to the network will also help extend its range.
See this TechBrief from Dallas Semiconductor for more info on using the diode fix, cable length issues and lots of technical information about one wire networking issues.
Jumpers
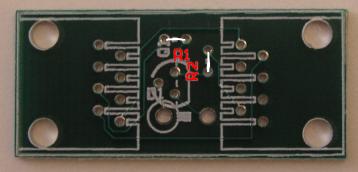
Jumper R1 selects passive 1-wire operation
Jumper R2 selects +5v power from RJ-45 pin 2
Pinouts
DS9097U Serial Port Adapter
 | |
| 1 | NC |
| 2 | 1-wire data |
| 3 | GND |
| 4 | NC |
DT1A Temperature Sensor modules
 | |
| 1 | NC |
| 2 | +5v power to R2 jumper |
| 3 | NC |
| 4 | 1-wire data |
| 5 | GND |
| 6 | NC |
| 7 | NC |
| 8 | NC |
Connecting Sensors
When wiring the DT1A sensors together and to the adapter you MUST use a straight thru cable. Alot of the pre-made telephone cables you will find out there are actually twisted from one end to the other and will not work for a 1-wire network.
To make sure you have a straight thru cable you should hold the connectors next to each other, facing the same direction, and confirm that the colors are in the same order in both connectors.
If you need to make your own cables, Radio Shack has cheap ($9 or so) crip tools and RJ-11 connectors so you can make your own straight thru cables.
Building Sensors
I have put together a page of instructions on building DigiTemp sensors yourself. I had to use what pictures I already have, since I am out of unbuilt sensors, but i think it should be pretty easy to figure out. If someone wants to sell pre-built sensors please send me a link to your website so that I can point people towards you.
If you want to make your own PC boards, here are the Eagle and Gerber files.
More technical references:
Dallas Semiconductor, maker of the 1-wire temperature sensors
iButton.com, Dallas's 1-wire and iButton site. Sells DS9097 adapters
DS18S20 (DS18S20-PAR)
DS1822, (DS1822-PAR)
DS18B20 (DS18B20-PAR)
DS2423 Counter
One Wire Network Design Guide
DS1820 error report document (local copy)
App. Note #74 (local copy)
DS9097 Adapter
DS9097U-009 Adapter